Ever wondered how to bring your favorite cue stick back to life? A cue tip repair kit might just be your best friend. Whether you're a casual player or a seasoned pro, having a reliable repair kit can save you time, money, and frustration. But let's be real—choosing the right one can feel like navigating a maze. In this guide, we'll break it down for you, step by step.
Picture this: you're in the middle of an epic game, and suddenly—bam! Your cue tip starts flaking off. It's every pool player's nightmare. But don't panic just yet. With a cue tip repair kit, you can fix that issue faster than you can say "break shot." This guide will walk you through everything you need to know about these kits, from what they are to how to use them like a pro.
Now, before we dive into the nitty-gritty, let's address the elephant in the room. Not all cue tip repair kits are created equal. Some are great, some are mediocre, and others? Well, let's just say they're more trouble than they're worth. But fear not, my friend. By the end of this article, you'll know exactly what to look for and how to make the best choice for your needs.
Read also:Nicole Kidman And Keith Urban Is Their Marriage Really Over
What is a Cue Tip Repair Kit Anyway?
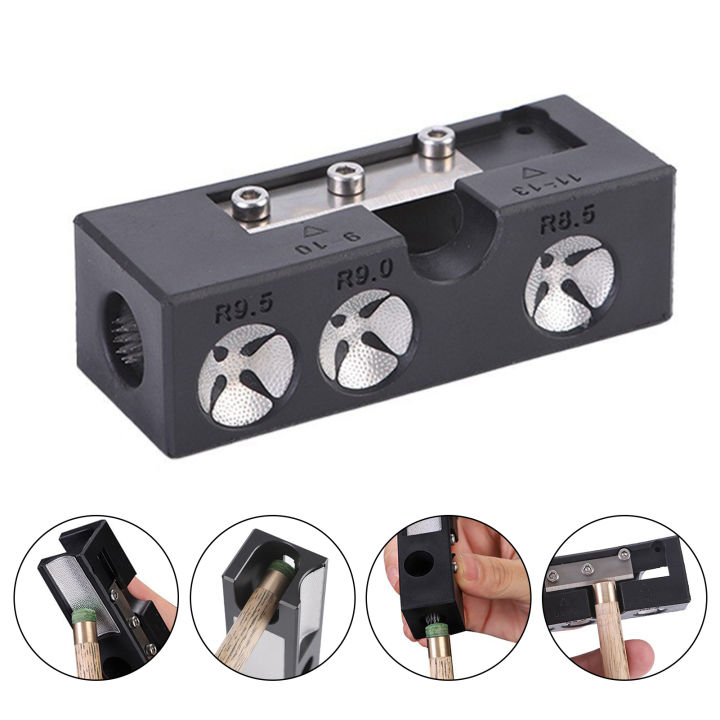
Let's start with the basics. A cue tip repair kit is essentially a set of tools and materials designed to help you fix or replace the tip of your cue stick. Think of it as a mini toolbox for your pool-playing adventures. These kits usually come with everything you need to perform a quick and effective repair, from replacement tips to sandpaper and adhesive glue.
But why is it important? Well, your cue tip is the part of the stick that makes contact with the cue ball. If it's worn out or damaged, your game can suffer big time. A good repair kit ensures that your cue stick is always in top shape, ready to take on any challenge. And let's face it—who doesn't want to play their best game every time?
Why Do You Need One?
Here's the thing: even the best cue sticks in the world can wear down over time. Constant use, improper storage, or just plain bad luck can lead to a damaged cue tip. And when that happens, your accuracy and control can go right out the window. A cue tip repair kit gives you the power to fix the issue yourself, without having to shell out big bucks for a professional repair.
Not to mention, it's super convenient. No more waiting around for days (or even weeks) to get your cue stick fixed. With a repair kit, you can tackle the problem in a matter of minutes. Plus, it's a great skill to have, whether you're playing at home or in a tournament. Trust me, your fellow players will be impressed.
Types of Cue Tip Repair Kits
Now that we know what a cue tip repair kit is, let's talk about the different types available. There are a few main categories to consider:
- Basic Kits: These are great for beginners or casual players who don't need all the bells and whistles. They usually include a few replacement tips, some sandpaper, and a small tube of glue.
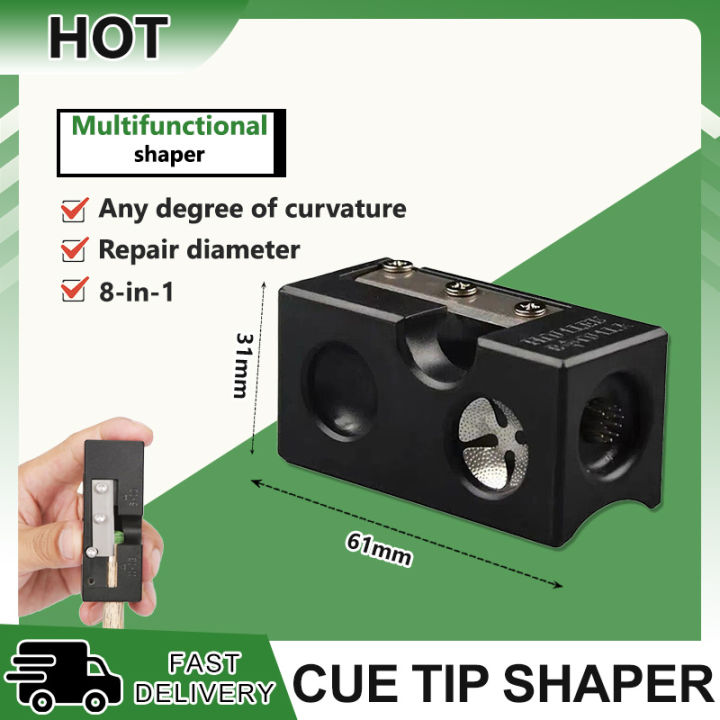
- Premium Kits: If you're a serious player, a premium kit might be the way to go. These kits often come with higher-quality materials and additional tools, like tip shapers and buffers.
- DIY Kits: For the handy folks out there, DIY kits let you customize your repair process. You can choose your own tips, glue, and other materials to create the perfect setup for your game.
Each type has its own pros and cons, so it's important to consider your skill level and needs before making a purchase. But don't worry—we'll get into more detail later on.
Read also:Regis Philbin Talks Health Journey From Heart Surgery To A Vibrant Retirement
Factors to Consider When Choosing a Kit
Before you hit the "buy" button, there are a few key factors to keep in mind:
- Quality of Materials: Look for kits that use high-quality tips and glue. Cheaper materials might save you money upfront, but they could lead to more problems down the line.
- Tool Variety: Some kits come with a wide range of tools, while others are more basic. Decide what you need based on your experience level and playing style.
- Price: Budget matters, right? Find a kit that fits your financial situation without compromising on quality.
By considering these factors, you'll be able to find the perfect cue tip repair kit for your needs. And trust me, it's worth taking the time to do your research.
How to Use a Cue Tip Repair Kit
Alright, let's get down to business. Using a cue tip repair kit is easier than you might think. Here's a step-by-step guide to help you through the process:
Step 1: Gather Your Materials
Before you start, make sure you have everything you need. Most kits will come with:
- Replacement cue tips
- Sandpaper (various grits)
- Adhesive glue
- Tip shaper (optional)
Having all your tools ready will make the process smoother and more efficient.
Step 2: Remove the Old Tip
If your old tip is still attached, you'll need to remove it first. Use a sharp knife or blade to carefully cut around the edges of the tip. Be gentle—you don't want to damage the ferrule. Once the tip is loose, gently pull it off.
Step 3: Clean the Ferrule
Before attaching a new tip, make sure the ferrule is clean and dry. Use a soft cloth to wipe away any dirt or residue. This will ensure a strong bond between the ferrule and the new tip.
Step 4: Apply the Glue
Apply a small amount of adhesive glue to the ferrule. You don't need much—just enough to hold the tip in place. Spread the glue evenly to avoid any air bubbles or gaps.
Step 5: Attach the New Tip
Place the new tip onto the ferrule, pressing it firmly into place. Hold it for a few seconds to ensure a secure bond. Let the glue dry completely before moving on to the next step.
Step 6: Shape and Sand the Tip
Once the glue is dry, use sandpaper to shape the tip to your desired size and shape. Start with a coarse grit and work your way up to a finer grit for a smooth finish. If your kit includes a tip shaper, now's the time to use it.
And there you have it—your cue stick is good as new. Easy, right?
Common Mistakes to Avoid
Even the best of us make mistakes sometimes. Here are a few common errors to watch out for when using a cue tip repair kit:
- Using Too Much Glue: This can lead to a messy repair and weaken the bond between the tip and ferrule.
- Sandpaper Too Coarse: Starting with too coarse a grit can damage the tip or leave it uneven.
- Not Letting the Glue Dry: Rushing the process can result in a weak bond, leading to more problems later on.
By avoiding these mistakes, you'll ensure a successful repair every time.
Top Recommended Cue Tip Repair Kits
Now that you know how to use a repair kit, let's talk about some of the best options on the market. Here are a few top picks:
- Master Cue Repair Kit: A premium option with high-quality materials and a wide range of tools.
- ProLine Basic Repair Kit: Perfect for beginners, this kit includes everything you need at an affordable price.
- Custom Cue DIY Kit: Ideal for those who want to customize their repair process, this kit lets you choose your own materials.
Each of these kits has its own strengths, so be sure to read reviews and compare features before making your decision.
Tips for Maintaining Your Cue Stick
Fixing your cue tip is important, but so is maintaining your cue stick in general. Here are a few tips to keep your stick in top condition:
- Store It Properly: Always store your cue stick in a cool, dry place to prevent warping or damage.
- Chalk Regularly: Using chalk can help improve your grip and reduce wear on the tip.
- Inspect for Damage: Regularly check your cue stick for any signs of wear or damage, and address them promptly.
By following these tips, you'll be able to extend the life of your cue stick and keep it in great shape for years to come.
Conclusion
So there you have it—a comprehensive guide to cue tip repair kits. Whether you're a casual player or a serious competitor, having the right repair kit can make all the difference in your game. Remember to choose a kit that fits your needs, follow the steps carefully, and avoid common mistakes.
And don't forget to take care of your cue stick in general. A little maintenance goes a long way in ensuring that your stick is always ready for action. So go ahead, grab your repair kit, and get to work. Your next great game is just around the corner!
Now, it's your turn. Have you tried a cue tip repair kit before? What was your experience like? Leave a comment below and let us know. And if you found this article helpful, be sure to share it with your fellow pool players. Happy gaming!
Table of Contents