Ever wondered how pool balls should be racked? Well, let me tell ya, there’s more to it than just tossing those colorful spheres into a triangle and hoping for the best. Properly racking pool balls isn’t just about aesthetics—it’s about setting yourself up for success on the table. Whether you’re a newbie or a seasoned player, understanding how to rack ‘em right can make all the difference in your game.
Imagine this: You’ve got your cue stick in hand, ready to break, but the rack is loose, and balls scatter everywhere—not exactly the start you wanted. That’s why learning how pool balls should be racked is crucial. It’s not rocket science, but it does require a bit of finesse and attention to detail. Stick around, and I’ll break it down for you step by step.
Now, before we dive deeper into the art of racking, let’s talk about why it matters. A tight rack means better control over the break shot, which can lead to more solids or stripes pocketed right off the bat. Plus, it’s just plain satisfying to watch those balls fly exactly where you want them to go. So, let’s get started and master the perfect rack!
Read also:Chrissy Teigen Shares Baby Boy Ultrasound With A Dash Of Humor
Daftar Isi
- Introduction: Why Racking Matters
- The History of Racking Pool Balls
- Types of Racks and Their Uses
- Step-by-Step Guide to Racking
- Common Mistakes to Avoid
- Tips for Beginners
- Advanced Techniques for Serious Players
- Troubleshooting: Fixing a Loose Rack
- Maintaining Your Rack
- Conclusion: Perfect Your Rack, Perfect Your Game
Why Racking Matters
Before we jump into the nitty-gritty, let’s address the elephant in the room: Why does racking even matter? Well, here’s the deal—when you’re playing pool, the break shot is often the most important shot of the game. If your rack is loose or uneven, it can affect the entire flow of the game. A well-racked set of balls allows for a clean break, increasing your chances of sinking the first ball and controlling the table.
Think of it like building a house. If the foundation is shaky, everything else falls apart. The same goes for pool. A solid rack is the foundation of a great game. So, yeah, it’s kinda a big deal.
The History of Racking Pool Balls
You might be surprised to learn that the concept of racking pool balls has been around for centuries. Back in the day, when pool was still in its infancy, players would simply arrange the balls in a loose cluster and hope for the best. But as the game evolved, so did the tools and techniques used to play it.
Today, we have standardized racks that ensure consistency and fairness in gameplay. From wooden triangles to plastic molds, the evolution of racking tools reflects the growing importance of precision in the sport. And let’s be real—those fancy racks make the game look way cooler, too!
Types of Racks and Their Uses
Not all racks are created equal. Depending on the type of pool game you’re playing, you might need a different rack. Here’s a quick rundown of the most common ones:
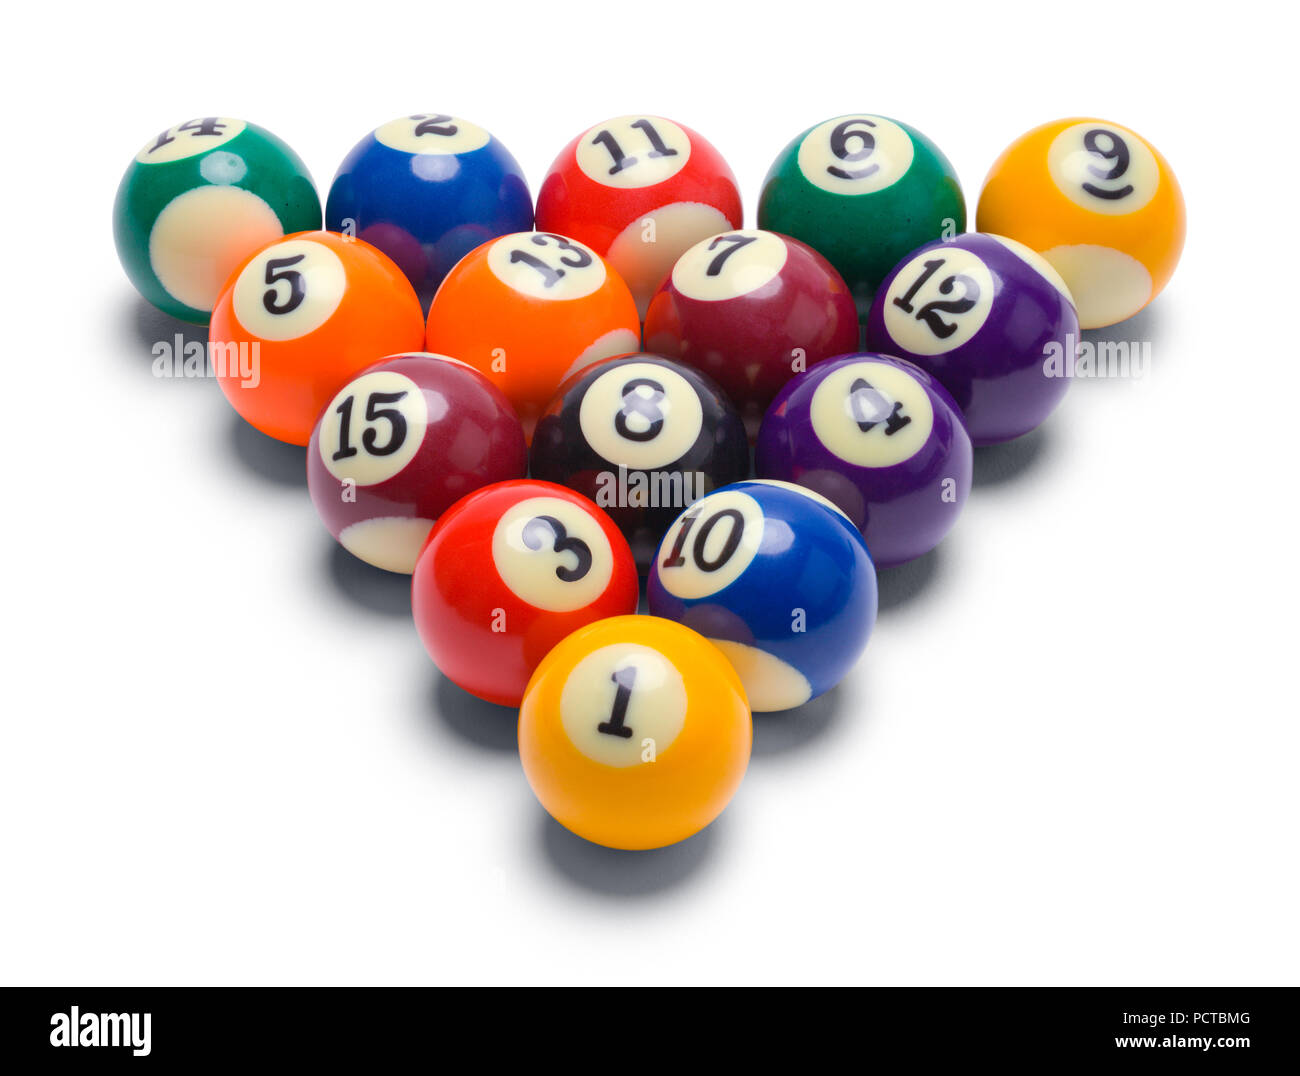
- Triangle Rack: The classic choice for 8-ball and 9-ball games. It holds 15 balls in a perfect triangle.
- Diamond Rack: Used for straight pool and other specialty games. Holds 15 balls in a diamond shape.
- Hexagonal Rack: For 10-ball games, this rack holds 10 balls in a hexagonal pattern.
- Custom Racks: Some players prefer custom-designed racks for specific games or personal preference.
Choosing the right rack for your game can make all the difference. Don’t just grab any old triangle and hope for the best—make sure it fits the rules of the game you’re playing.
Read also:Meghan Marklersquos Secret Baptism Into The Church Of England Herersquos What Happened
Step-by-Step Guide to Racking
Step 1: Arrange the Balls
Start by arranging the balls in the correct order. For 8-ball, the 8-ball should always be in the center of the triangle. Surround it with a mix of solids and stripes, ensuring no two solids or stripes are touching each other. This creates a balanced rack that’s fair for both players.
Step 2: Place the Rack
Position the rack on the table, aligning it with the foot spot. This is the designated spot where the apex ball (the one at the front of the rack) should be placed. Make sure the rack is level and stable before proceeding.
Step 3: Press Down Firmly
Here’s where the magic happens. Gently press down on the rack to ensure all the balls are tightly packed together. A loose rack can lead to a weak break, so take your time and make sure it’s snug.
Step 4: Lift the Rack
Once you’re satisfied with the tightness of the rack, carefully lift it off the table. Be gentle—disturbing the balls at this stage can ruin all your hard work. If everything looks good, you’re ready to break!
Common Mistakes to Avoid
Even the best players make mistakes when racking pool balls. Here are a few pitfalls to watch out for:
- Loose Balls: A loose rack can cause the balls to scatter unpredictably during the break. Press down firmly to avoid this issue.
- Improper Alignment: Make sure the apex ball is directly over the foot spot. Misalignment can affect the trajectory of the break shot.
- Forgetting the 8-Ball: In 8-ball games, always place the 8-ball in the center. Failing to do so can result in a penalty or even a loss of game.
By avoiding these common mistakes, you’ll set yourself up for a smoother and more successful game.
Tips for Beginners
If you’re new to the game, don’t worry—racking is something you can master with a little practice. Here are a few tips to help you get started:
- Practice makes perfect. Spend some time practicing your racking technique until it becomes second nature.
- Invest in a quality rack. A durable, well-made rack will last longer and provide better results than a cheap one.
- Ask for feedback. If you’re playing with more experienced players, ask them to critique your rack. They might have valuable insights to share.
Remember, the goal is to have fun while improving your skills. Don’t get discouraged if it takes a while to get the hang of it—you’ll get there!
Advanced Techniques for Serious Players
For those of you who take pool seriously, there are a few advanced techniques you can try to elevate your racking game:
- Custom Weighted Balls: Some players use slightly heavier balls in specific positions to create a more predictable break.
- Custom Racks: Experiment with different rack shapes and materials to find what works best for your style of play.
- Practice Drills: Set up racks in unconventional patterns to challenge yourself and improve your breaking technique.
These techniques might not be necessary for casual players, but they can give you an edge in competitive situations.
Troubleshooting: Fixing a Loose Rack
So, you’ve racked the balls, but they’re still loose. What gives? Here are a few troubleshooting tips to help you fix the issue:
- Check the Rack: Make sure your rack isn’t warped or damaged. A faulty rack can cause balls to shift during the break.
- Press Harder: Sometimes, a little extra pressure can make all the difference. Don’t be afraid to press down firmly to ensure a tight rack.
- Inspect the Balls: Over time, pool balls can wear down or become scratched. Replace any damaged balls to maintain consistency.
If none of these solutions work, it might be time to consult a professional or invest in a new rack.
Maintaining Your Rack
Like any piece of equipment, your rack needs regular maintenance to perform at its best. Here’s how to keep it in tip-top shape:
- Clean Regularly: Wipe down your rack after each use to remove dust and debris.
- Store Properly: Keep your rack in a cool, dry place to prevent warping or damage.
- Inspect for Damage: Periodically check your rack for cracks or other signs of wear and tear. Replace it if necessary.
A well-maintained rack will last longer and provide better results, so don’t neglect this important step.
Conclusion: Perfect Your Rack, Perfect Your Game
There you have it—the ultimate guide to racking pool balls like a pro. From understanding the history of racking to mastering advanced techniques, you now have all the tools you need to take your game to the next level. Remember, a good rack is the foundation of a great game, so take the time to get it right.
Now, it’s your turn to put this knowledge into action. Grab your rack, practice your technique, and show off your skills at your next pool game. And hey, if you found this article helpful, don’t forget to share it with your friends or leave a comment below. Let’s keep the conversation going and help each other improve our game!